Getting Started with Pulsar Evaluation Kit
Welcome to Pulsar Evaluation Kit (EVK). This kit provides a complete platform for hands-on experience with the world’s first mass-market neuromorphic processor, Pulsar Spiking Neural Processor (SNP).
The EVK is designed to give you a straightforward path to developing and deploying a new wave of intelligent, power-efficient, sensor-based applications. This page guides you through setting up your kit and running sample projects. These projects can help you prototype new applications that require power-efficient machine learning models and sensor-based functionalities. Visit the Pulsar EVK Board Datasheet page and Pulsar Datasheet to learn more about the hardware components and features.
Warning
To prevent damage from static electricity or contact with conductive materials (e.g., metals), always take proper anti-static precautions when handling the board. Mistreatment may cause short circuits, component damage, fire, or other severe failures.
This guide walks you through the entire setup process, from unboxing the hardware to running your first test.
Gather Requirements
Before setting up, ensure your host computer meets the following specifications:
Operating System: Windows 10 or later (64-bit); Ubuntu Linux 22.04 LTS or later (Intel/AMD64-bit); macOS 12.0 or later (Intel or Apple Silicon)
RAM: A minimum of 8 GB, with 16 GB recommended
Hard-drive space: A minimum of 50 GB free space (100 GB recommended)
CPU: A minimum of 4 cores (8 cores recommended)
Connectivity: A USB Type-C to Type-A cable
Additional Software: Visual Studio Code, Docker, Dev Containers extension for Visual Studio Code (recommended), Python >= 3.7
Internet: A stable internet connection (needed to download Docker images and repositories)
Note
Before proceeding, ensure the physical boards remain disconnected. Double-check connections to avoid issues during later steps.
Note
Windows Requirements
If you are developing on Windows, ensure you have:
Windows 10 or later
Python >= 3.7 installed and added to PATH
Docker Desktop installed and running
Visual Studio Code and Dev Containers extension
Required USB drivers for Pulsar EVK (see hardware vendor documentation)
Git Bash or Windows Terminal for command-line operations
Connect the Boards
Your Pulsar EVK includes two main boards: the IgnisCore and the SenseForge.
Unpack the IgnisCore board, SenseForge board, and the provided mounting hardware.
Connect IgnisCore to the SenseForge board by aligning and linking the expansion headers.
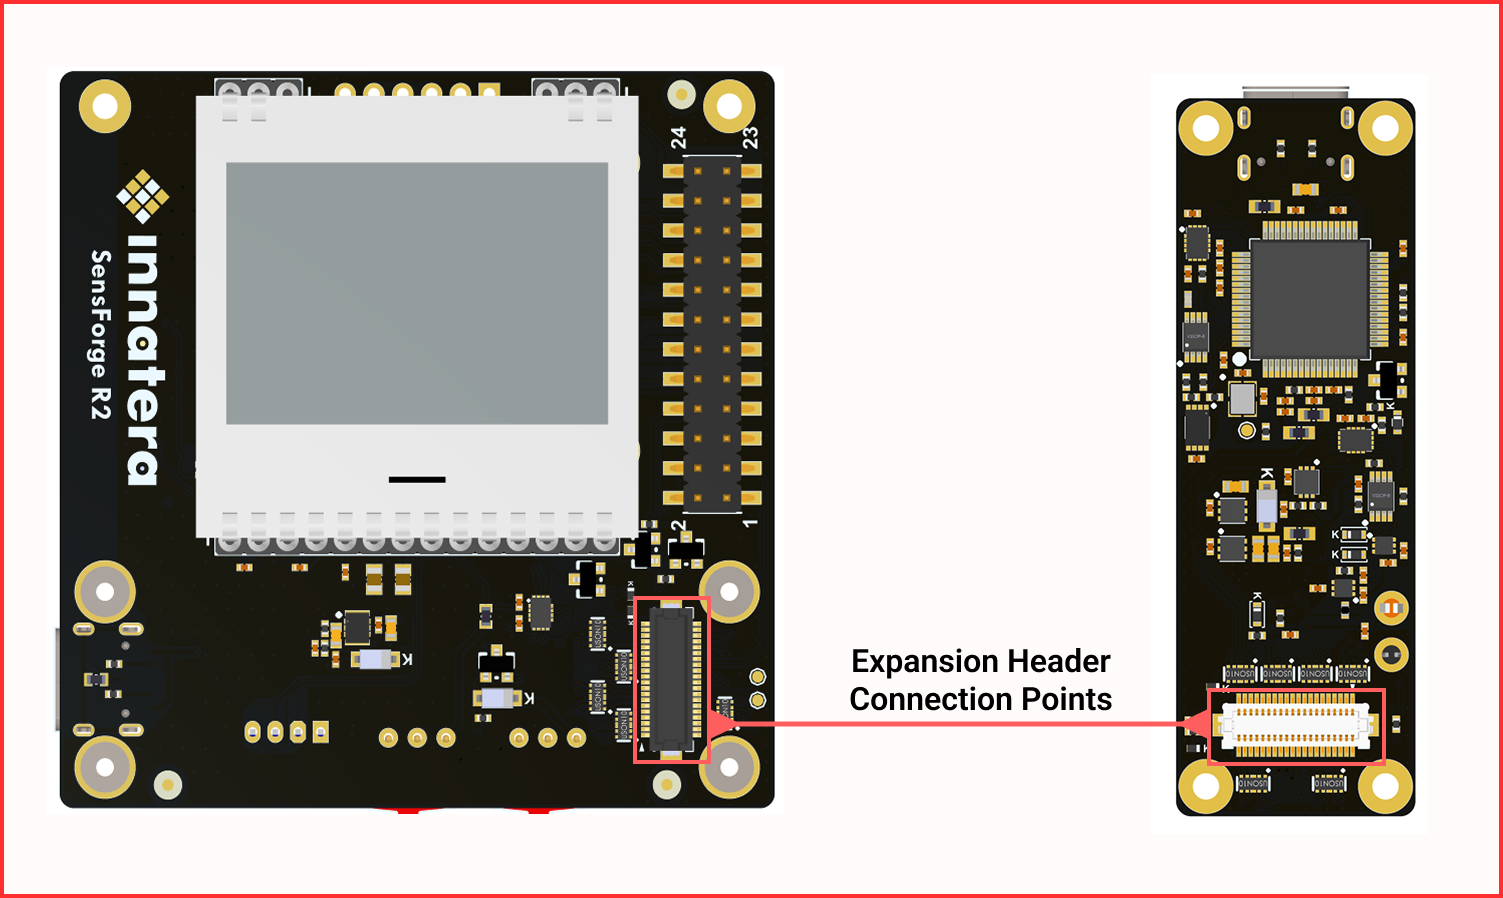
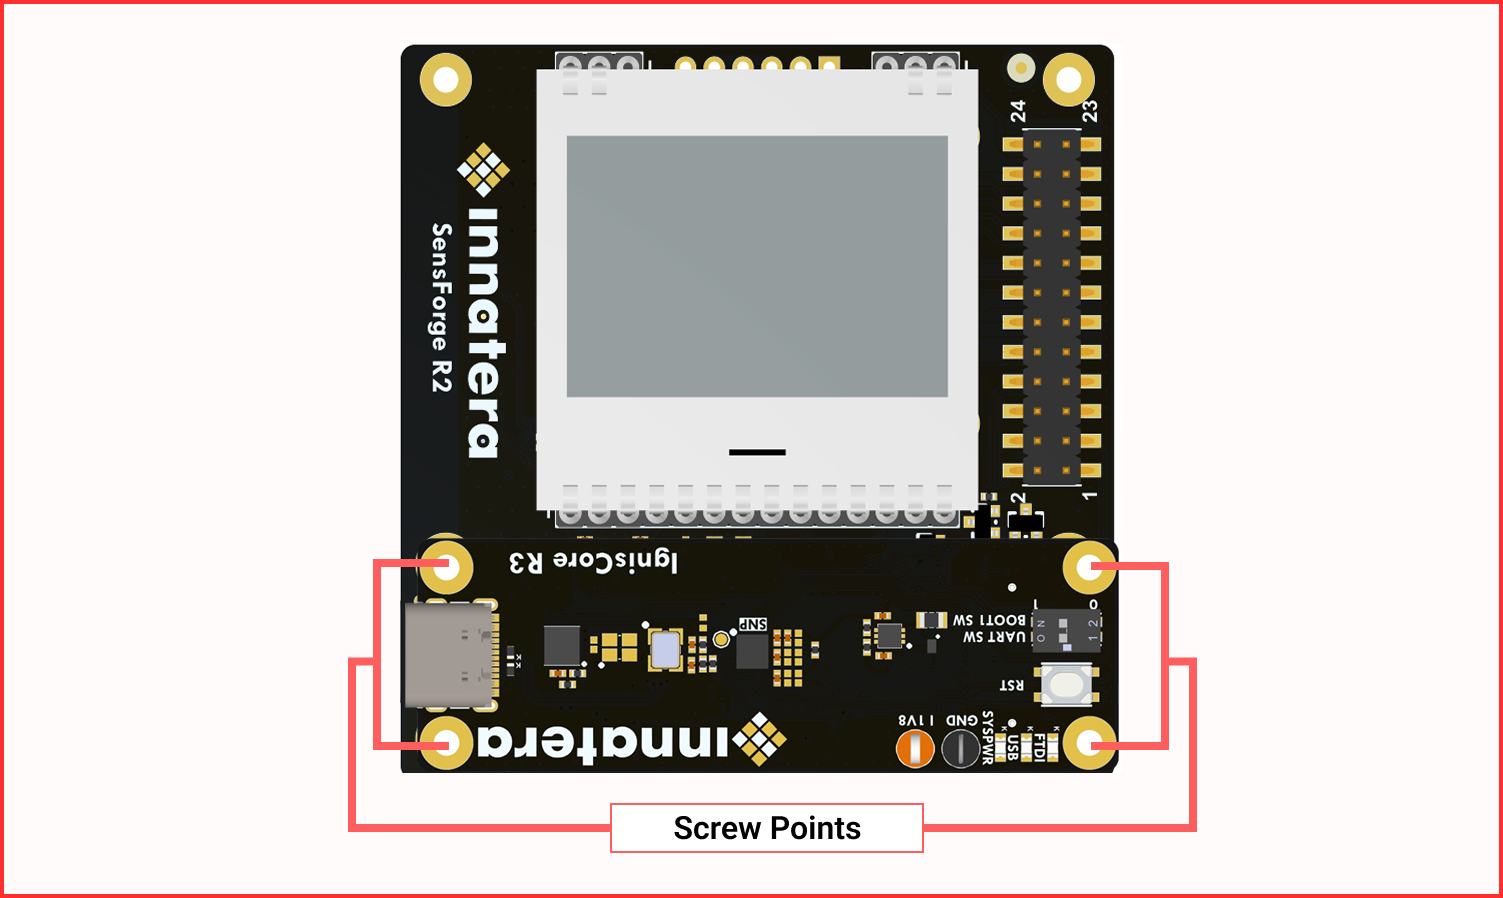
Use the standoffs and screws to secure the two boards together.
Connect the assembled board (IgnisCore USB port) to your computer using a USB-C cable.
Boot from Flash (Hardware “Hello World”)
The Pulsar EVK board ships with a default boot image in flash memory. To run the pre-loaded test:
Start with the Pulsar EVK board unplugged.
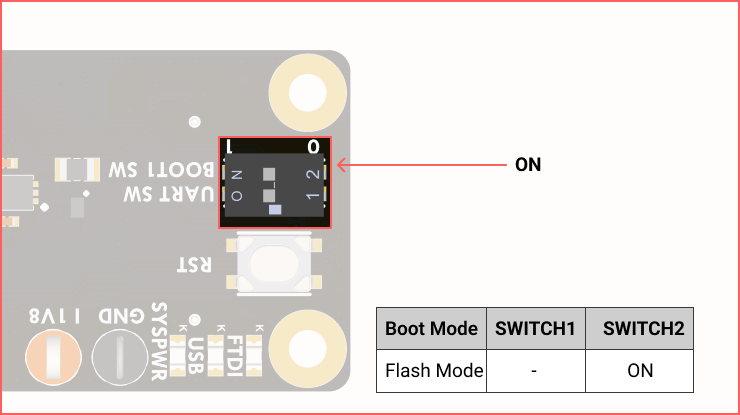
Locate the Boot Select Switch on the IgnisCore board.
To boot from flash, set BOOT1 to the ON (up) position.
Connect the board to your computer via USB-C.
If using a laptop, ensure it is connected to mains power.
You should see the green “PWR” LED light and other status LEDs indicate activity (e.g., blinking).
Note
You can also power the board with two CR2032 batteries on the SenseForge board.
Remember to switch BOOT1 back to the down position (programming/UART) when you are ready to connect to the software environment.
Setup Environment
For an optimal development experience we recommend using the pre-configured Docker image that includes the Talamo SDK. Alternatively, you can install the Talamo and Spine SDKs manually (see the Talamo and Spine installation pages).
Note
Before you begin
Ensure you have:
[x] sudo access to configure hardware control settings
[x] Docker installed and running
[x] The
<TOKEN_NAME>and<TOKEN_PASSWORD>(credentials from Innatera)[x] The correct image tag
<PULSAR_SDK_VERSION>for the Talamo image
Get Pre-installed Docker Image (SPINE & Talamo)
Step 1: Authenticate with the Docker Registry
To access the Talamo SDK image, authenticate with the Innatera Azure Container Registry (ACR). Open a terminal and run (replace placeholders with your credentials):
docker login innatera.azurecr.io -u <TOKEN_NAME> -p <TOKEN_PASSWORD>
A “Login Succeeded” message will confirm that you are authenticated.
Warning
Entering your password directly in the command line may store it in your shell’s history. For enhanced security, consider using the --password-stdin option.
Step 2: Pull the Talamo SDK Image
Once authenticated, download the Talamo SDK image to your local machine. Run the following command, replacing <PULSAR_SDK_VERSION> with the specific version tag provided to you by Innatera (e.g., talamo_sdk_3.0.1).
docker pull innatera.azurecr.io/sdk:<PULSAR_SDK_VERSION>
Downloading may take a few minutes depending on your network connection speed.
Step 3: Verify the Installation
Finally, verify that the Docker image and the Talamo SDK within it are functioning correctly. Run the following command, ensuring you use the same version tag as in the previous step:
docker run --rm innatera.azurecr.io/sdk:<PULSAR_SDK_VERSION> python -c "import talamo; print(talamo.__version__)"
This should print the Talamo SDK version.
Warning
Troubleshoot
Login Fails: Please double-check your token name and password.
Pull Fails: Ensure you have a stable internet connection and sufficient local disk space.
Verification Fails: If the
import talamocommand fails, the image may be corrupted. Please try pulling the image again. If the issue persists, contact Innatera support.
Running EVK Bridge
The EVK Bridge is a cross-platform Python application that enables the Talamo SDK Docker container to communicate with an EVK board without requiring direct hardware access. Tools within the Docker container can connect to the server port configured by the EVK Bridge to boot and interact with the firmware on Pulsar EVK.
Installation
The EVK Bridge is supplied as a Python Wheel file (.whl), and should be installed using pip:
python3 -m pip install evk_bridge-<version>-py3-none-any.whl[gui]
(Where <version> matches the provided version number.)
Omit the [gui] extras if you do not need GUI dependencies. The GUI requires TkInter and Python 3.7+.
Note
On Windows you may need to use python instead of python3 on the command line.
If pip outputs a warning about the PATH environment variable, it is recommended that the provided directory be added so that the EVK Bridge can be started more easily.
Linux: udev rules and groups
Setting Up udev Rules
Add udev rules so the device is accessible without root. Create the file /etc/udev/rules.d/99-Pulsarboard.rules with the following contents:
cat <<EOF | sudo tee /etc/udev/rules.d/99-Pulsarboard.rules
SUBSYSTEM=="usb", ATTR{idVendor}=="0403", ATTR{idProduct}=="6001", GROUP="plugdev", MODE="0664"
SUBSYSTEM=="usb", ATTR{idVendor}=="0403", ATTR{idProduct}=="6011", GROUP="plugdev", MODE="0664"
EOF
After copying the file, refresh the udev rules by running:
sudo udevadm control --reload-rules && sudo udevadm trigger
Modifying User Groups
Users of the Pulsar SNP board must be added to both the plugdev and dialout groups. Add your user to the required groups:
sudo adduser $USER plugdev
sudo adduser $USER dialout
If the command doesn’t work as is, replace $USER with your actual username.
Note
After modifying group memberships, you must log out and log back in for the changes to take effect. Alternatively, you can restart your system, as simply opening a new terminal will not suffice.
Verify group membership with:
Once logged back in, verify that your user has been added to the correct groups by running:
groups
You should see both plugdev and dialout listed among your group memberships.
Warning
Troubleshoot
If you still encounter permission issues after following the previous steps:
Try logging out and then back in, or restarting your system after updating the group memberships. This simple step often resolves such problems.
Make sure that the file named
99-Pulsarboard.rulesis correctly placed in the/etc/udev/rules.d/directory and that its contents are correct.If the issue continues, try disconnecting and reconnecting your Pulsar board after making these changes. When reconnecting the Pulsar board, it is advisable to wait a few seconds after unplugging it before switching it back on to allow the system to discharge fully.
Windows Drivers
Two supported options exist for Windows driver installation:
Install FTDI D2XX drivers from FTDI’s website (requires the PyFtdiWin package).
Use a tool like Zadig to change the composite parent driver to libusb-win32 (recommended for debugging).
Note
Newer Windows versions may auto-install drivers. Use Option 2 to enable debugging.
macOS
The libusb1.0 library is used to communicate with Pulsar EVK via the pyftdi package. It can be installed using Homebrew using the following command.
brew install libusb
Usage
After installing the Python wheel, start the EVK Bridge by running:
evk_bridge
Followed by any required arguments. Run with -h to see the complete set of available command line options.
If the PATH environment variable is not set up correctly, it may be necessary to run instead:
python -m evk_bridge
Note
Set the EVK_BRIDGE_GUI=1 environment variable to always run the GUI.
This can be used to create a window-manager shortcut to the evk-bridge script (Linux) or executable (Windows) or to start the application automatically upon login.
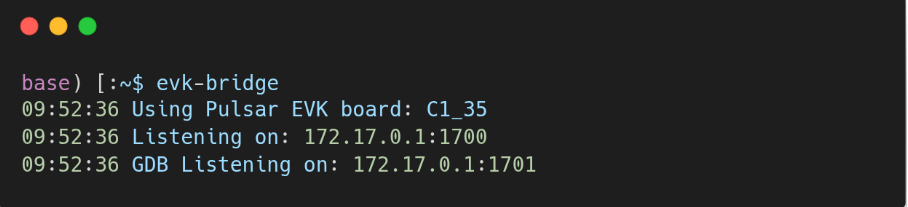
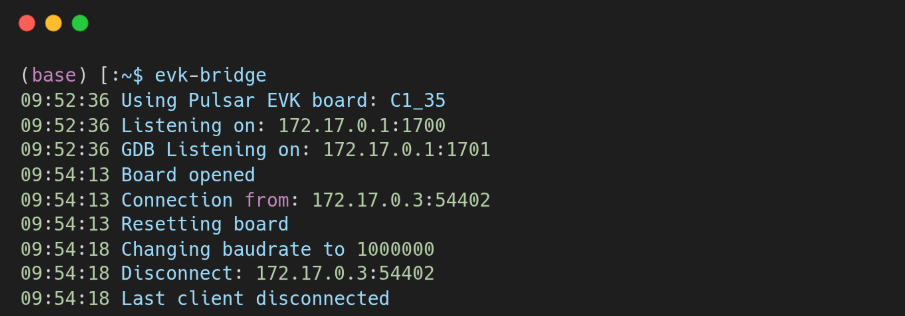
Below you can see the EVK bridge running in a terminal (Linux):
Warning
Ensure the EVK Bridge is running when attempting to connect to the board. If the USB-C cable is disconnected while the bridge is running, restart the bridge before reconnecting.
Warning
Troubleshoot
If you see the following error message when trying to connect: “SerialException: Could not open port socket://172.17.0.1:1700: [Errno 111] Connection refused.” Then it’s likely that the EVK bridge is not running. Run the EVK bridge and try to connect again.
If the problem continues, try disconnecting and reconnecting your Pulsar board. If you are reconnecting the Pulsar board, it is recommended that you wait a few seconds after unplugging it before powering it back on, allowing the system to discharge fully.
Uninstallation
Uninstall the EVK Bridge using this command:
python -m pip uninstall evk_bridge